Second Battle of El Alamein
The British 8th Army received a new commander in August of 1942. His name
was Bernard Montgomery and he intended to win the war in North Africa once and
for all. His plan, despite Churchill's constant call for action, was to
build his strength up to a preponderant advantage over the Axis and then to
strike them decisively. Rommel's spoiling attack at the end of August (1st
Battle of El Alamein) had been stopped with little change to
this plan. Monty spent the next six weeks building up his
forces until he had over 1100 tanks ready to go, including 250 of the new
American Sherman tanks (stripped from the U.S. 1st Armored Division), 170
Grants, 120 Stuarts, 300 Crusaders, and 200 Valentines. This was matched
by only 250 German tanks and 300 obsolete Italian tanks. Monty had plenty
of anti-tank guns available with over 800 of the new 6 pdrs in his inventory against
just 300 of the new German 50 mm guns. Monty also enjoyed a manpower
advantage of 220,000 against 115,000. The Allied side included soldiers
from every corner of the British Empire and then some, with troops from Great
Britain, Australia, New Zealand, South Africa, India,
France, and Greece.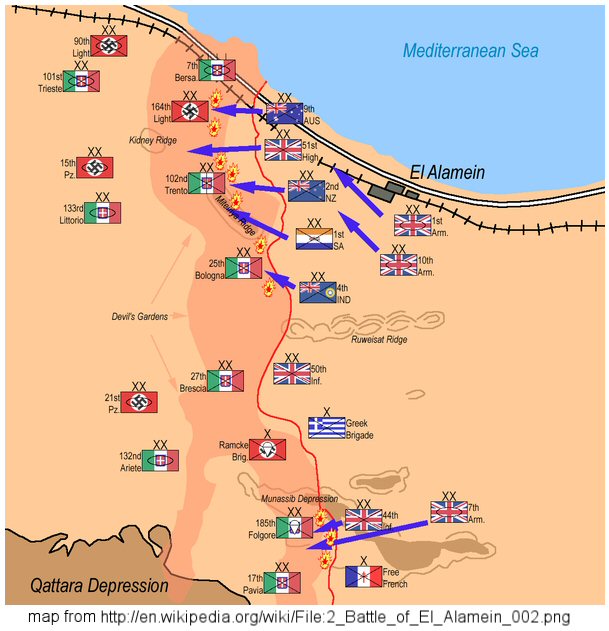
The position near El Alamein was a chokepoint that had been selected by the Allies as an emergency fall-back position, only 40 miles long from the coast to the massive impassable Qattara Depression on the south end. This position now worked in favor of the Axis forces. Over 500,000 mines (nearly all anti-tank) had been laid in a belt almost 5 miles deep. This position was further re-enforced by miles of barbed wire and dug-in Axis defenders. The immobile infantry divisions manned the front while the mobile divisions stood ready for immediate counterattack against any breakthroughs. The armored reserve in the south consisted of the 21st Panzer and Ariete Armored Divisions while the north was backed up by the 15th Panzer and the Littorio Armored Divisions. The 90th Light Division and the Trieste Motorized Division defended against possible amphibious assault from the coast and acted as a further mobile reserve. Rommel's critical fuel situation, however, limited maneuver for even his mobile divisions.
The first phase of the battle (Operation Lightfoot) began in the evening hours of October 23rd with a general artillery barrage across the entire 40 mile front by 882 artillery pieces followed by a more precise bombardment of specific targets to support the infantry advance. Four divisions of foot soldiers from XXX Corps then stepped off in the north and advanced by foot across the anti-tank mines, followed by engineers using the new Scottish Mine Detectors and Scorpion mine clearing tanks. The goal of the engineers was to clear two 24 foot wide lanes all the way through 5 miles of minefield. Tanks of the 1st and 10th Armored divisions would then pass through in single file into the enemy rear. The tanks would protect the infantry from counterattack while they consolidated the front and would then seek out the German panzers and destroy them. Going was slow and the paths were not cleared on schedule and most of the infantry stalled short of their objective line. On October 26th, Rommel's expected counter attack was launched by the 15th Panzer and 164th Light Divisions with the other mobile divisions also coming forward to help contain the Allies. The Allies were able to hold this attack off but casualties on both sides were piling up.
While this fighting was taking place, Monty was readying a mobile reserve, consisting of the 2nd New Zealand Infantry (all mounted in trucks) and the 1st and 7th Armored Divisions. On November 2nd, Operation Supercharge was launched with the New Zealanders and attached 9th Armored Brigade opening a hole for the tanks of the 1st and 7th Armored. The weakened Axis forces, now desperately short of tanks and fuel, were not able to stop this attack and the front began to crumble. On November 4th, Rommel ordered a partial retreat to another position which quickly deteriated into a general retreat with many of the unmotorized Italians left behind. By November 11th, Egypt had been cleared and the Axis forces had lost 37,000 men and virtually all of their tanks. The Trento, Bologna, and Ariete Divisions had been completely destroyed and the rest of the Axis forces were in tatters. This defeat, along with the U.S. and British landings in Morroco and Algeria which had begun on November 8th, signaled the end of the Axis bid in North Africa, although final Allied victory would still take six more months of hard fighting.
|
Allied Forces (8th Army) X Corps
XIII Corps
XXX Corps
|
Panzer Army Africa
German Afrika Korps
Italian Army Africa
Italian X Corps
Italian XX Corps
Italian XXI Corps
|