Battle of Gazala
After Rommel's breakout in the early part of 1942, the Allied forces had dug into a defensive line 30 miles west of Tobruk, anchored in the north near Gazala. Rommel had exhausted his tanks and supplies and was unable to advance any further. With both sides now having a secure supply port in their rear (Bengazi for the Axis and Tobruk for the Allies), both armies were content to remain in place for now and build their forces.
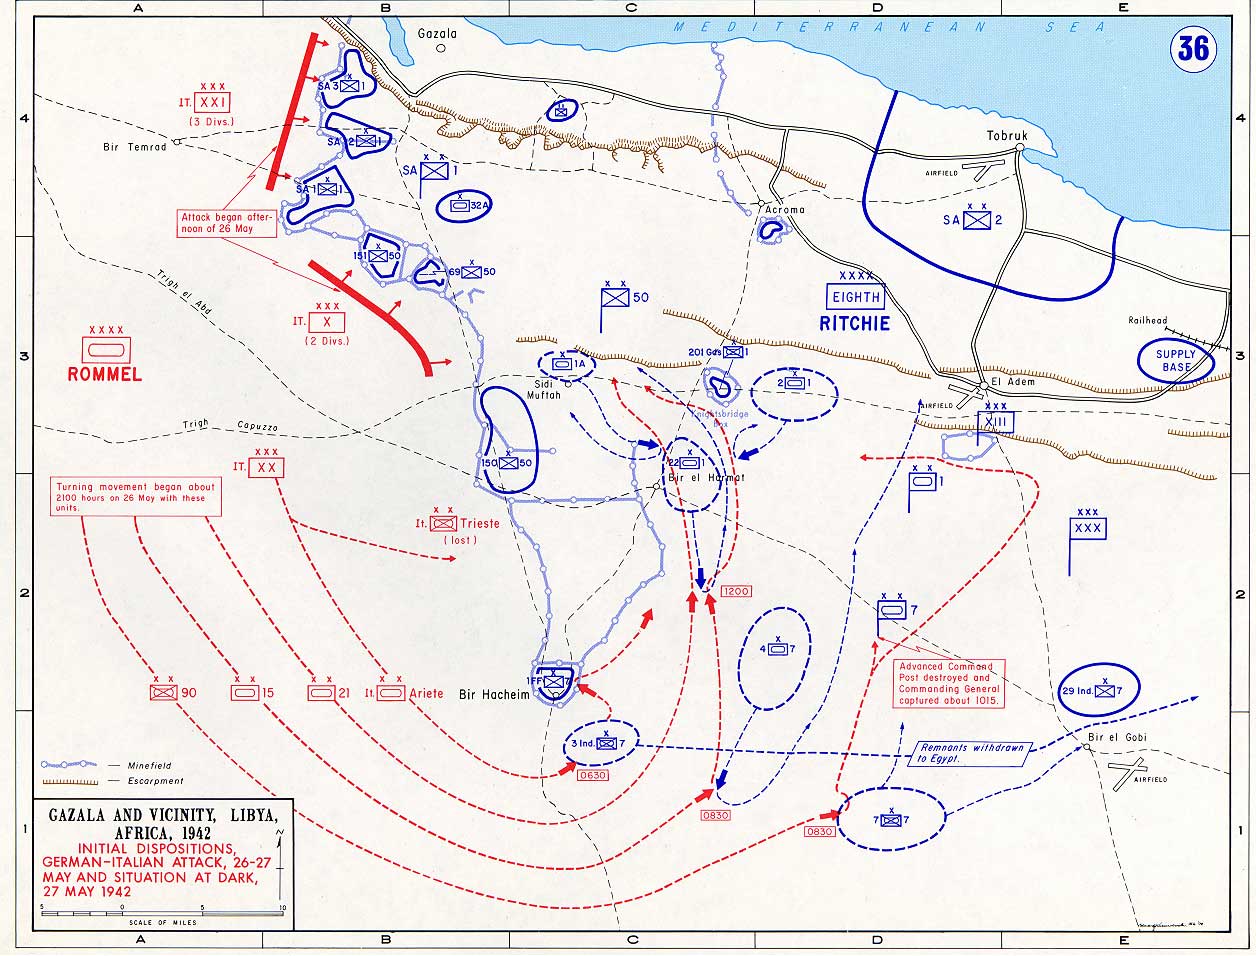
The British position consisted of a series of fortified "boxes", each occupied by a brigade and configured for all around defense against the mobile Axis forces. Deployed in the north was the 1st South African Division, with the British 50th Infantry to the south of them. Between them, these two divisions occupied six fortified brigade boxes. Finally, guarding the southern flank, was the 1st Free French Brigade, dug into a box almost 50 miles from the coast. The British armored formations were deployed as a reserve behind these infantry groups, with the 1st and 32nd Tank Brigades backing up the northern troops, while the 1st and 7th Armored Divisions covered the southern part of the front. Also in place were thousands of mines and miles of wire, mostly taken from the defenses of Tobruk. The Allied plan was to sit in their fortified positions and build their tank strength up until they had at least a 3-2 advantage over the Germans. Then, and only then, would they launch an attack on the Axis forces.
With extra help from the Italian Navy, almost all Axis supplies and reinforcements sent in April and May had gotten through. With these convoys, Rommel was not only able to rebuild his Panzer divisions, but actually had them overstrength in tanks at the beginning of his offensive, named Operation Venezia. Rommel's battle plan was a familiar one, with the Italian Infantry tying up as many Allied troops in the north as possible, while the mobile divisions swept around the southern flank. While the Italian Ariete Armored Division took care of the Free French box at Bir Hacheim, the 15th and 21st Panzer would sweep south of the box and engage the British armor, destroying them and then advancing north to the coast, destroying as many trapped Allied divisions as possible. Tobruk was expected to fall as a consequence of all this. Meanwhile, the 90th Light Division would swing still further south and end up north of Tobruk, disrupting supplies and reinforcements to the battle area. Finally, the Italian Trieste Motorized Infantry Division would clear a corridor through the minefields south of Bir Hacheim and maintain it as a supply route for the German panzer divisions.
|
8th Army (Allies)
XIII Corps 1st South African Infantry Division 2nd South African Infantry Division
XXX Corps
|
Panzer Army Afrika
Deutsches Afrika Korps
Italian XX Motorized Corps
Group Cruwell
Italian X Corps
Italian XXI Corps |